Monday, December 1, 2014
December is here
Wednesday, October 17, 2012
studio & watermelon necklace
Monday, December 12, 2011
Baby knitting for friend
Friday, May 7, 2010
knitting project bag


I haven't sewn anything in a while because I need to get my serger and better sewing machine fixed and need to get over wanting to be perfect the first time by being meticulous and if I can't serge it it shouldn't stop me from creating so I designed something new. I haven't designed something new in a loner while than i haven't sewn and realized that that part of by brain had been sleeping so it was hard to visualize how to sew my creation at first trying to get all seam between outer and inner fabric. So I ended up drawing the steps instead of just explaining in words like usual. Here is the finished product of the first prototype. Just a plain bag to hold your current or on hold knitting projects. I notice that if I leave my project around and not up high and in a bag of some sort that the cats with chew on the needles, play with the yarn eventually sliding the stitches off the needles. So here is my solution. On the inside is a piece of ribbon sewn to the inside to slide circular needles through to keep the stitches on the needles and a little button hole at the top back side to stick straight needles through so that they don't poke a hole through the bag. the top of the bag folds over and both layers have button holes to button close with a cute fabric covered button.
Friday, December 4, 2009
knitting book idea
Sunday, November 29, 2009
ezra
Thursday, November 12, 2009
I'm back
a lot has happened since March. I now reside in my States capital, Austin. The land of outdoor living, the vegan option, breweries inside of BBQ joints, LOTS of food choices, small venue shows, the option to see practacally any music group that tours, vinyl, disc golf courses, plant stores, coffee shops, and enough yarn stores to make me jump up and down like I downed 2 pots of coffee.
knitting i've finished: the Tuck vest sweater, another cloche hat, 6 neck warmers, one prototype hat; & started knitting: another prototype hat, another neck warmer, my forest arm warmer pattern.
sewn: butterick 5994 pattern cut to be a shirt, one wallet, new look 6705 (which I would not reckamend, simmilar to the built by wendy patterns the arm holes are too small and high which makes the front of the blouse pucker out), autamen cover, back cusion for an overstuffed chair, 1 curtain.
Crafted: 15 Boutonnieres from scratch made up of fabric buttons, fabric leaves & fabric yoyos; 13 hair pieces consisting of 3 mini fabric yoyos on a bobby pin; fabric roses with 3 double sided fabric petals & more fabric buttons all for my best friends wedding; a puppy/cat bed from half of a vintage suitcase and 4 wooden legs from a hardware store with a pillow in a vintage pillowcase for cusioning.
Arts: Drawings: guache, watercolor & ink: 2 small paintings on wood & 2 on aquaboard, 1 (18" x 24") large face series, 7 (5.5" x 8.5") medium faces series, 5 (4" x 5.5") small faces series, 4 (4" x 5.5") character faces series, 6 (2 med, 4 small) house series, 2 (4" x 5.5") forest series; ink: (6" x 8"): 20 house series, 4 forest series, 1 character face series; pencil: (6" x 8") 7 abstract series.
We have some new additions to our family a 10 gallon aquarium full of fish and live plants, Isabella a cat and Lola our 9 weeks old hound dog mix we adopted from Canine and Cats (CNC) rescue organization. If you are interested in adopting a dog, they post up in front of Petco on brodie lane and another organization Austin Pets Alive posts up in front of Petsmart also on brodie lane.
I've also ventured into organic gardening, eco-friendly cleaning and felt hat making.
An eco-friendly tip to cleaning up dog pee or poo from rug:
what you need:
spray bottle of vinegar
baking soda
salt
paper towels
wash rag
samll container for a bowl 1/3 filled with water
scrub brush that fits into the small container
What to do:
Pour some salt onto the Pee (only for pee)
Pick up poo; for pee pick up pee and salt with paper towels
spray vinegar onto area of rug
sprinkle some baking soda onto area of rug
take your scrub brush from the water bowl and scrub area
(you can repeat the vinegar and baking soda steps as needed)
then rub area dry with wash cloth
Sunday, March 8, 2009
Ruffled Neck Kercheif
Saturday, March 7, 2009
Spinning
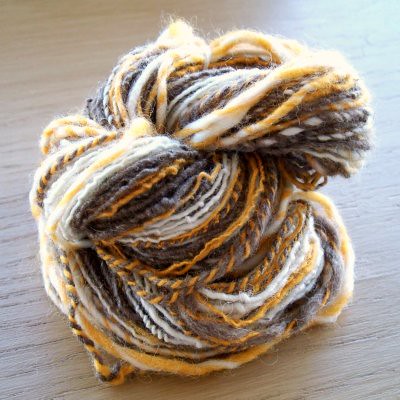
So a couple of weeks ago after visiting the Austin yarn stores for a week I felt the urge one day that I wanted to spin. I'd eyed the wool but just in passing. I was there for the yarn. It looked interesting some of the fiber braided some of it wrapped into what looked like woolen watermelons some in bags. There were lots of colors, mesh bins and drawers full. (I'm refering to Hill country Weavers) Different types and of course prices. And little ol' me not quite knowing how much an oz of wool roving would be bought 4oz of turmeric, white and brown in basic sliver wool. Ok, so that is a lot of wool. The ladies at the yarn store warned me 2oz is enough to start out with of each color. But that is ok; I plan on spinning it all. I also got a basic small wooden drop spindle and after searching you tube I learned the basics from Megan and started spinning. I spun and spun deciding I liked the top whorl method and rolling it down my right leg (twisting the fibers clockwise) while sitting and while spinning in the car (in the passenger seat) I spun the dowel part with my fingers.
So far all I have to show are my first two days work. I don't seem to be a very fast spinner, but that is ok. I love how the first two came out. After I had spun them I wrapped them around a chair back and tied some extra string around the yarn in 2 places making a hank. Then I boiled the hank. I didn't realize it was going to smell like sheep. After removing it from the pot I extracted the extra water with a towel and shimmied it back around the chair back (this part was hard) and if I couldn't I untied it and wrapped it around anew. A mostly let it air dry using a hair dryer some because I was ancy to hold it and say it was finished. Now I can say I'm a spinner, yay. It is exhilarating learning something new related to something you really love, knitting.
Saturday, February 28, 2009
Kniting Needle Preference
Friday, February 13, 2009
acorn hat pattern

I plan on making this pattern available to be bought at a later time, but before I do I want some people to knit and critique the pattern (for design and the written pattern itself
) for me and in exchange the pattern will be free for them. If you are interested in following through this proccess reply to this post or message me on ravlery. 2 Spots still available as of 2/14/09.
Monday, February 2, 2009
DFW Fiber Fest
This sounds pretty cool, vendors and classes.
DFW Fiber Fest is a yearly event that occurs in April in the Dallas-Ft. Worth area. It is dedicated to offering classes from both nationally known and local teachers in crocheting, dyeing, hand knitting, machine knitting, spinning, weaving, and other fiber arts. Other related topics such as button-making, colour choices, are also offered.
For 2009, DFW FiberFest is held on Friday - Sunday, April 24-26, 2009
at theAddison Conference Center
15650 Addison Road
Addison, Texas 75001
Map Website
dfwfiberfest
How to knit a ruffle
Ruffles are usually something you want to add to something. It tends to look better that way. Rather than just going into a ruffle pattern instead of Binding Off and then picking up the stitches and making the ruffle pattern.
There are some different ways to pick up and knit stitches. One way is to tie the yarn you are going to make the ruffle with to the tail yarn that is the left over from the Casting On at the beginning. And using a crochet hook, I tend to use a size 5/H, pick up the yarn (you are using for the ruffle) with the hook and pull through last loop of every row along that edge. You want to pull the loops through so that they come out on the top. You can then slip the loops off of the crochet hook and onto your knitting needle.
- pick up the number of stitches divisible by 4.
- Purl
- Purl 2, Make 1, Knit 3, [Purl 2, Make 1, Knit 2] 4 times, Purl 2, Make 1, Knit 3
- knit the knit stitches, purl the purl stitches and the new stitches (make 1).
- Purl 2, Make 1, Knit 4, [Purl 2, Make 1, Knit 3] 4 times, Purl 2, Make 1, Knit 4
- repeat row 3
- Purl 2, Make 1, Knit 5, [Purl2, Make 1, Knit 4] 4 times, Purl 2, Make 1, Knit 5
- repeat row 3
- Purl 2, Make 1, Knit 6, [Purl 2, Make 1, Knit 5] 4 times, Purl 2, Make 1, Knit 6 [You can continue to make the ruffle wider just increase one after every purl stitch on the right side and repeat row 3 for every wrong side]
- Bind off stitches in the pattern (meaning bind off knit stitches as knit stitches and purl stitches as purl stitches. (ruffle instructions from "boutique knits")
M1 (Make 1): Lift the yarn lying between the stitch just worked and the next stitch and place it on the left hand needle, then knit (from learn2knit.co.uk )

YO (Yarn Over): When working on the knit side of Stockinette Stitch hold the yarn at the back of the work. Pull the yarn forward between he two needles and over the right needle to the back of the work. Knit the next stitch. (from knit 911. com )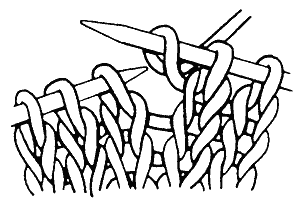
Friday, January 23, 2009
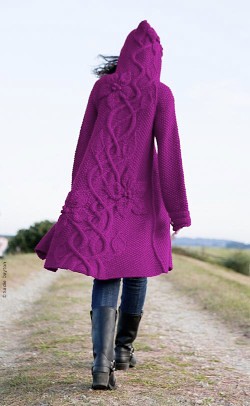
Sylvi by Mari Muinonen
Thursday, January 22, 2009
drinking lots of tea

Wednesday, January 21, 2009
More wash rags
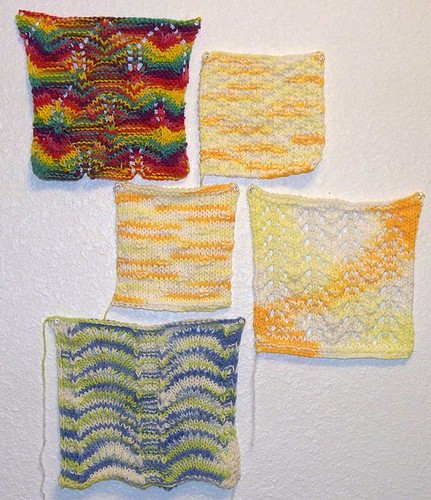
the rainbow one is diagonal eyelet brocade, blue & green is the fan stitch, the large orange yellow & white one is chevron lace, the top orange yellow is the moss stitch and the left orange yellow is sugar cubes.
The chevron lace pattern I found in the book boutique knits and the rest in the book Vogue Knitting Stitchionary
Saturday, January 17, 2009
TMNT Masks

 (finished knitting)
 (after crochet eyes)
I know some boys who love the Teenage Mutant Ninja Turtles and after being on a knitting frenzy lately. I came up with this.
Knit in stockinet with the eye section knit open like a rectangle to go back crochet around the eye opening to make it two holes & with the ends of the mask decreased to make an angle to mimic the rolling up of a bandana like the TMNT use for their eye masks.
Knit with Lion Brand Wool Yarn in colors Pumpkin & Purple
Needle Size US6(purple) and US8(orange)
Here is the free pattern:
row 1-7 (bottom half), 8-12 (left side of eyes), 13-17 (right side of eyes), 18-24 (top half)
- CO 162
- P
- K1, K2tog, knit to last 3 stitches, ssk, K1
- p
- K1, K2tog, knit to last 3 stitches, ssk, K1
- P
- K1, K2tog, K 63, BO 27, K 63, ssk, K1
- (left side of eyes (BO stitches) on mask) P till BO
- K to last 3 stitches, ssk, K1
- P till BO
- K to last 3 stitches, ssk, K1
- P till BO, CO 27, cut yarn leaving a 6 inch tail
- (right side of eyes (BO stitches) on mask) P
- K1, K2tog, K till BO
- P till end
- K1, K2tog, K till BO
- P till end
- K1, K2tog, K to last 3 stitches, ssk, K1
- P
- K1, K2tog, K to last 3 stitches, ssk, K1
- P
- K1, K2tog, K to last 3 stitches, ssk, K1
- P
- (Bind Off Row)K1, K2tog, psso, continue to BO till last 3 stitches, ssk, psso, K1, psso, cut yarn, tie off
Weave in ends. Go back and crochet around eye hole & in the middle crochet two stitches on the bottom to two stitches on the top to make the eye opening two eye holes. Also crochet across CO edging because that seems to have come out more loose than the BO edging and will lay more flat on the face if you reinforce it with crocheting. The Lion Brand wool yarn says it is good for felting on the tag. I haven't felted one yet, so I'll post about how felting one turns out when I do so because the pattern wants to roll. I'm also making one with a seed stitch to stop the rolling.
posted on craftster.org
if you make a mask please post a picture of it :)
Wednesday, January 14, 2009
new book added to my collection
Tuesday, January 13, 2009
the acorn hat


Since I finished the first faze of this project for the moment, in researching for my next design project I opened up my newest Anthropologie catalog issue January 2009. And found one of the few knitted items on pg. 43 the withering frost vest. After finding the project that now interests me I set out to find what the stitch pattern is for the vest, searching google, ravelry, and library knitting books with not much luck. My husband and I ending up going to Hastings (a book and AV store) after our home church group where we are going to be going through the book of Mark this semester, anyways at Hastings I found two similar stitches one was in the “forest park dresser scarf” from the book “101 Designer One-Skein Wonders: A world of possibilities inspired by just one skein” by Judith Durant and the other from the pattern “wedding ensemble skirt” from the book “Inspired to Knit: Creating Exquisite Hand Knits” by Michele Rose Orne. I'll post swatches of those two designs later. I think this is going to be an ongoing project.
Saturday, January 10, 2009
How to cable knit stitch


“simple cable” stitch is worked over 6 stitches (which means wherever you want to place the “simple cable” stitch it is going to takes 6 stitches in a row to make) & explained here knitted flat on straight knitting needles (meaning you knit a row moving stitches from the left hand needle to the right hand needle (where the tip of the right hand needle is pointed to the left) and when you are finished knitting the row and all of your stitches are now on the right hand needle you turn the right hand needle like a weathervane now to point to the right and becomes the needle that is now in your left hand ready to be purled)
Row 1: knit 6 stitches
Row 2: purl 6 stitches
Row 3: knit 6 stitches
Row 4: purl 6 stitches
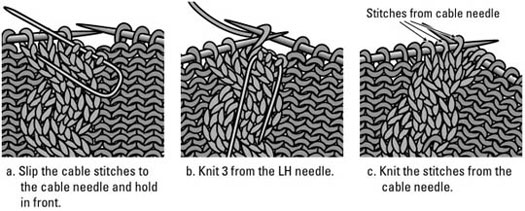
Row 5: slip first 3 stitches on to an extra needle and pull this needle in front of your work so that the 3 stitches on the extra needle are resting in front of your knitting. Then knit next 3 stitches. Now slip the 3 stitches you slipped off onto the extra needle back onto your left hand needle and knit them.
Row 6: Purl 6 stitches
To continue in cable stitch repeat rows 1-6 over and over.
Here are a couple of links if you still need some help with visualizing this process:
for Mia


