
here are some examples of cable stitch holders:


“simple cable” stitch is worked over 6 stitches (which means wherever you want to place the “simple cable” stitch it is going to takes 6 stitches in a row to make) & explained here knitted flat on straight knitting needles (meaning you knit a row moving stitches from the left hand needle to the right hand needle (where the tip of the right hand needle is pointed to the left) and when you are finished knitting the row and all of your stitches are now on the right hand needle you turn the right hand needle like a weathervane now to point to the right and becomes the needle that is now in your left hand ready to be purled)
Row 1: knit 6 stitches
Row 2: purl 6 stitches
Row 3: knit 6 stitches
Row 4: purl 6 stitches
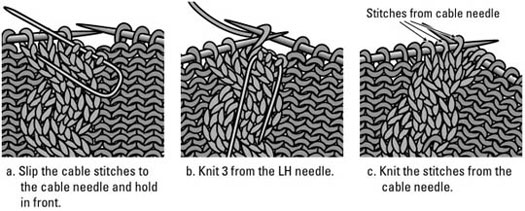
Row 5: slip first 3 stitches on to an extra needle and pull this needle in front of your work so that the 3 stitches on the extra needle are resting in front of your knitting. Then knit next 3 stitches. Now slip the 3 stitches you slipped off onto the extra needle back onto your left hand needle and knit them.
Row 6: Purl 6 stitches
To continue in cable stitch repeat rows 1-6 over and over.
Here are a couple of links if you still need some help with visualizing this process:
for Mia
No comments:
Post a Comment