Showing posts with label knitted. Show all posts

Thursday, March 12, 2009

"Tuck", spinning and a little striped mole

Marigold smoothie mango, peach & fresh orange again from daily juice. A little striped mole plushie my little sister made for a class of hers to remind her of mole: a unit of amount of substance.

The "Tuck" back is finished. The yarn is Cascade Yarns 220 Heathers in 2440. It took almost 2 skiens. I knit the back with size US 8 needles.


I bought some new fiber the other day from Hill Country Weavers. A brown alpaca and a baby sky blue wool 2oz. of each this time. Up till now I've only spun the sliver wool. The alpaca is sooo soft and I like the way it seperates when I pull on the roving to thin it more than the how the wool reacts. Here is my drop spindle in action spinning away.


woops, the yarn escaped the groove. I hadn't even noticed when taking pictures.

Here is a days work of the right front of the "Tuck" vest by Norah Gaughan. The pattern is in the Berroco pattern boolet spring/summer 2009 Norah Gaughan "excess story" collection. The cover says story: flower child which is the other collection in the same booklet. The yarn is also a Cascade Yarns 220 in a grayish color. I'm using size US6 needles for the front pieces.


Friday, February 13, 2009

acorn hat pattern


I plan on making this pattern available to be bought at a later time, but before I do I want some people to knit and critique the pattern (for design and the written pattern itself
) for me and in exchange the pattern will be free for them. If you are interested in following through this proccess reply to this post or message me on ravlery. 2 Spots still available as of 2/14/09.

Monday, February 2, 2009

How to knit a ruffle

Ruffles are usually something you want to add to something. It tends to look better that way. Rather than just going into a ruffle pattern instead of Binding Off and then picking up the stitches and making the ruffle pattern.

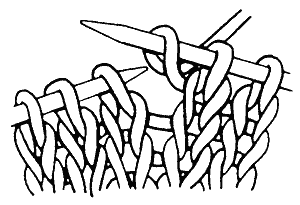
There are some different ways to pick up and knit stitches. One way is to tie the yarn you are going to make the ruffle with to the tail yarn that is the left over from the Casting On at the beginning. And using a crochet hook, I tend to use a size 5/H, pick up the yarn (you are using for the ruffle) with the hook and pull through last loop of every row along that edge. You want to pull the loops through so that they come out on the top. You can then slip the loops off of the crochet hook and onto your knitting needle.

  1. pick up the number of stitches divisible by 4.

  2. Purl

  3. Purl 2, Make 1, Knit 3, [Purl 2, Make 1, Knit 2] 4 times, Purl 2, Make 1, Knit 3

  4. knit the knit stitches, purl the purl stitches and the new stitches (make 1).

  5. Purl 2, Make 1, Knit 4, [Purl 2, Make 1, Knit 3] 4 times, Purl 2, Make 1, Knit 4

  6. repeat row 3

  7. Purl 2, Make 1, Knit 5, [Purl2, Make 1, Knit 4] 4 times, Purl 2, Make 1, Knit 5

  8. repeat row 3

  9. Purl 2, Make 1, Knit 6, [Purl 2, Make 1, Knit 5] 4 times, Purl 2, Make 1, Knit 6 [You can continue to make the ruffle wider just increase one after every purl stitch on the right side and repeat row 3 for every wrong side]

  10. Bind off stitches in the pattern (meaning bind off knit stitches as knit stitches and purl stitches as purl stitches. (ruffle instructions from "boutique knits")
Make 1(M1) can be interchanges with Yarn overs (Yo) instead either way it makes a ruffle.

M1 (Make 1): Lift the yarn lying between the stitch just worked and the next stitch and place it on the left hand needle, then knit (from learn2knit.co.uk )


YO (Yarn Over): When working on the knit side of Stockinette Stitch hold the yarn at the back of the work. Pull the yarn forward between he two needles and over the right needle to the back of the work. Knit the next stitch. (from knit 911. com )
Friday, January 23, 2009

Sylvi by Mari Muinonen


I bought my first PDF knitted pattern today. I think it is beautiful. It is called Sylvi by Mari Muinonen located on the website twist collective. It is $7 but I thought it was worth it, since I like it so much. I was thinking of making it in purple, yellow, or blue.

Thursday, January 22, 2009

drinking lots of tea


On my fifth cup of tea the boiling water reminded me that I wanted to try and shrink my acorn hat. So I filled a sauce pot with water till it began to boil I placed the hat in the pot poking it under the boiling water with tongs. I let it soak for 4min. I poured out the water in the sink and with the tongs I placed the hat on a folded in half towel waiting on the floor. It was still steaming, so carefully I laid the scalloped edging out flat. The hat didn't seam to have shrunk much. I think it got larger... So I'm filling up my spaghetti pot this time, the sauce pot seamed to be a little small. Ok so I let the hat boil in the pot for 20 minutes. It didn't shrink at all. I guess Lion Brand fishermen's wool doesn't shrink. Well now I know. This time when I poured out the hot water in the sink. I have a double sink, so I poured out the water in one and had dilled up the other side with cold water. And placed the hat into the cold water after pouring the water out. I squeezed the water out being sure not to rink it out & then hung it up to dry. When searching for info on shrinking knits I found this wool crafting.

I added the acorn rib pattern around the edge. I decreased the rim from 106 to 81 stitches. And now it is a dread hat.

Saturday, January 17, 2009

TMNT Masks


(finished knitting)
(after crochet eyes)
(before crochet eyes)

I know some boys who love the Teenage Mutant Ninja Turtles and after being on a knitting frenzy lately. I came up with this.

Knit in stockinet with the eye section knit open like a rectangle to go back crochet around the eye opening to make it two holes & with the ends of the mask decreased to make an angle to mimic the rolling up of a bandana like the TMNT use for their eye masks.

Knit with Lion Brand Wool Yarn in colors Pumpkin & Purple
Needle Size US6(purple) and US8(orange)

Here is the free pattern:
row 1-7 (bottom half), 8-12 (left side of eyes), 13-17 (right side of eyes), 18-24 (top half)
  1. CO 162
  2. P
  3. K1, K2tog, knit to last 3 stitches, ssk, K1
  4. p
  5. K1, K2tog, knit to last 3 stitches, ssk, K1
  6. P
  7. K1, K2tog, K 63, BO 27, K 63, ssk, K1
  8. (left side of eyes (BO stitches) on mask) P till BO
  9. K to last 3 stitches, ssk, K1
  10. P till BO
  11. K to last 3 stitches, ssk, K1
  12. P till BO, CO 27, cut yarn leaving a 6 inch tail
  13. (right side of eyes (BO stitches) on mask) P
  14. K1, K2tog, K till BO
  15. P till end
  16. K1, K2tog, K till BO
  17. P till end
  18. K1, K2tog, K to last 3 stitches, ssk, K1
  19. P
  20. K1, K2tog, K to last 3 stitches, ssk, K1
  21. P
  22. K1, K2tog, K to last 3 stitches, ssk, K1
  23. P
  24. (Bind Off Row)K1, K2tog, psso, continue to BO till last 3 stitches, ssk, psso, K1, psso, cut yarn, tie off

Weave in ends. Go back and crochet around eye hole & in the middle crochet two stitches on the bottom to two stitches on the top to make the eye opening two eye holes. Also crochet across CO edging because that seems to have come out more loose than the BO edging and will lay more flat on the face if you reinforce it with crocheting. The Lion Brand wool yarn says it is good for felting on the tag. I haven't felted one yet, so I'll post about how felting one turns out when I do so because the pattern wants to roll. I'm also making one with a seed stitch to stop the rolling.

posted on craftster.org

if you make a mask please post a picture of it :)

Wednesday, January 14, 2009

new book added to my collection

Last night I went to Barnes and Nobles with my mother who was visiting. First thing I did was raid the shelves of the knitting section and sat down with around 10 knitting books and one of their comfy chairs flipping through the pages intently looking at all of the stitch patterns and knitted designs. After putting them back on the shelves choosing three to look through again, to in the end choose one. I decided on “Vogue Knitting Stitchionary Volume One: Knit & Purl” by Trisha Malcolm. I figured I could use this book a lot considering my desire to make my own patterns. I felt honored afterwards because during the outing someone struck up a discussion with me by starting off with asking what the difference between sewing and knitting was and some more unusual conversation and I was able to by God’s grace entirely share with this person The Gospel which in my husbands and my life group (home church) this past week learned means Good News.

Tuesday, January 13, 2009

the acorn hat


Ok, the brown experiment is now officially a hat, yay. I guess I didn’t really notice till I put it on but the edges are scalloped from the body pattern, sweet. And when I saw it on me in the mirror my first instinct was it looks like an acorn so I lovingly named it that on ravelry. The yarn I used and the needle size made it pretty large on my head. I think I’m still going to add an edge to it as another variation of the hat. I have no idea how to make pdf files, so I’ll have to look into that so I can post the pattern on ravelry. I also want to try to shrink it as much as I can and see how small I can get it. I’m really honored with the four hearts it’s gotten so far on ravelry compared to my other three in total over all my other projects.


Since I finished the first faze of this project for the moment, in researching for my next design project I opened up my newest Anthropologie catalog issue January 2009. And found one of the few knitted items on pg. 43 the withering frost vest. After finding the project that now interests me I set out to find what the stitch pattern is for the vest, searching google, ravelry, and library knitting books with not much luck. My husband and I ending up going to Hastings (a book and AV store) after our home church group where we are going to be going through the book of Mark this semester, anyways at Hastings I found two similar stitches one was in the “forest park dresser scarf” from the book “101 Designer One-Skein Wonders: A world of possibilities inspired by just one skein” by Judith Durant and the other from the pattern “wedding ensemble skirt” from the book “Inspired to Knit: Creating Exquisite Hand Knits” by Michele Rose Orne. I'll post swatches of those two designs later. I think this is going to be an ongoing project.

Saturday, January 10, 2009

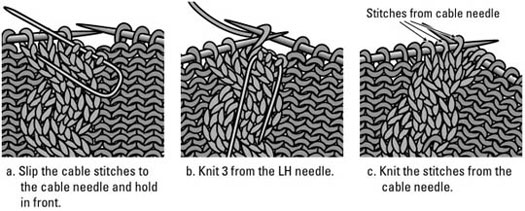
How to cable knit stitch

Ok, to make the most basic “simple cable” stitch. You will need an extra knitting needle (what I use is an extra knitting needle in the same size of knitting needles that I’m knitting with (small double pointed needles work well for this) or there are cable stitch holders (that when you slip the stitches you put aside in cable stitching onto these and then put back onto your left hand needle (I believe only when right handed) to stitch).

here are some examples of cable stitch holders:


“simple cable” stitch is worked over 6 stitches (which means wherever you want to place the “simple cable” stitch it is going to takes 6 stitches in a row to make) & explained here knitted flat on straight knitting needles (meaning you knit a row moving stitches from the left hand needle to the right hand needle (where the tip of the right hand needle is pointed to the left) and when you are finished knitting the row and all of your stitches are now on the right hand needle you turn the right hand needle like a weathervane now to point to the right and becomes the needle that is now in your left hand ready to be purled)


Row 1: knit 6 stitches
Row 2: purl 6 stitches
Row 3: knit 6 stitches
Row 4: purl 6 stitches
Row 5: slip first 3 stitches on to an extra needle and pull this needle in front of your work so that the 3 stitches on the extra needle are resting in front of your knitting. Then knit next 3 stitches. Now slip the 3 stitches you slipped off onto the extra needle back onto your left hand needle and knit them.
Row 6: Purl 6 stitches

To continue in cable stitch repeat rows 1-6 over and over.

Here are a couple of links if you still need some help with visualizing this process:


for Mia

Mr. Squid


I found the pattern for this in a craftster forum post . I thought it was really cute but I had no need for an I-pod cozy since I don't really use mine until my best friends boyfriend said he wanted me to make one for him when I was teaching her how to knit. I was really excited how quickly she picked it up. I decided on the squid pod cozy because he is a sculptor specializing in imaginary creatures in sculptie clay and the squid seemed to fit him. Anyways, the pattern is really easy, a one day project or a couple day project is you don't want to work on it all day. I changed a couple things in the pattern. The head shaping I decided to just repeat RND1 over and over instead of the RND1 RND2, RND1... I also added eyelets for button holes on the back flap. I added them in the 10th row down on the flap by (yo k2tog) for one side and (ssk yo) for later in that row for the other. And Like a real squid he has 8 little tentacles and 2 big ones with the fins. I used Fishermen's wool from Lion Brand yarn in natural brown that I got at Hobby Lobby and size US4 double pointed needles and for the gauge of making the 5" body it was 7 rows to an inch. In all I’m really happy with this project and I got to give it to him last night because it was his birthday. It was such a hit that another friend of mine wants one who is in love with monkeys. You know what I think I’m going to make him a sock monkey I-pod cozy that I noticed on Ravelry. Literally just thought of that, thanks God for the idea :)

Thursday, January 8, 2009

Glass Bottle Cozy


My Last trip to the Library I found a knitting book I'd never noticed on it's shelves before over the past month that i've been raiding the Libraries shelves of kniting pattern book. The book being "Knitting With Balls: A Hands-On Guide to Knitting for the Modern Man" by Michael Del Vecchio. I've chosen first to make the 3 cross cable "beer cozy". The pattern seems to be missing an increase row. So I added another row of yarn overs for row 12 instead of stopping at row 10 because I ended up with 31 stitches after row 10 instead of the 36 needed. I also ended up knitting 4 cable rows and finishing off with two rows of the pattern after the last cable row to match the two rows of pattern before the first cable row. And at the very top of the cozy to finish off I knitted one inch of knit and then flipped it over to make a collar of sorts. My gauge was 7 rows per inch.

Side Slip Cloche


Ok, so on our way back home from visiting the first set of parents for the holidays we stopped at a Borders because my parents had given my husband a gift certificate to buy books because that is pretty much all that he wants buy, ever. He could live in a book store especially a resale one if they'd allow him to set up camp and could convince me to live a life of yellowing pages and dust. And with this gift card was uber kind and told me he wanted me to pick out a book I wanted too. I looked at all the knitting books they had that I'd never heard of before. You don't get many new knitting books at our library. And out of all of these knitting books I decided not to get the book I was excited to check out because of a side bar add on craftster which was "Mason-Dixon Knitting Outside the Lines: Patterns, Stories, Pictures, True Confessions, Tricky Bits, Whole New Worlds, and Familiar Ones, Too" by Kay Gardiner and Ann Meador Shayne and published in September 08 and instead get "Boutique Knits: 20+ Must-Have Accessories" by Laura Irwin which was published in Nov. of 08. And I am thrilled about it, wanting to knit everything in the book. My husband was like yeah get this one because he thought a lot of the stuff was sexy and he wanted me to knit it for myself or I guess for him to see on me like the first thing I knitted from the book, the "Side Slip Cloche" hat. A picture of the hat is used as the cover of the book. I am really please with this hat. It didn't take that long at all to knit and it looks fabulous and my girl friends all want me to make them one too which makes me smile. I can't knit enough or fast enough to knit all of the presents I have planned, stuff to sell and stuff to keep. Oh, well such is life; I guess I'll just keep on knitting at my pace, which I don't mind.

Saturday, December 27, 2008

Knitted Wedding Veil


These are pictures from our wedding in Oct. I knitted my veil because I found this beautiful knitted veil pattern in the book "Wedding Knits: Handmade Gifts for Every Member of the Wedding Party" (Suss Cousins) and because I really don't like tulle and because I wanted to make my dress exactly like the one I wore from Project Alabama but didn't have enough time in our 5 month engagement, so I made my veil. It took me a few months just working on it in my free time, like before church and after work when I felt like it. I made the head piece out of thick jewelry wire and with thinner jewelry wire I connected the knitted loops to the head piece and beaded it with an assortment of yellow and gold beads.

Friday, December 26, 2008

Rastafarian Eyeball


I started knitting in the rnd and this is what came out, a little Rasta eyeball with dreads and a hat.
For the dreads I did one row of cable stitch and continued to decrease after that. The eye was called frog eyes in the googly eye section of hobby lobby.

I posted about it on craftster

Wednesday, December 24, 2008

brown baby hat


This is the baby wool hat pattern from the book "easy baby knits"(claire montgomerie) in size 6-12 months. In the book the pattern is to be knitted flat and then sewn together to make the hat. I decided to knit it in the round and do a knit2 purl2 rib around the bottom instead of the k1 p1 rib in the pattern and i didn't add a pom-pom because it is for a baby boy (Christmas present). I used lion brand yarn, fishermen's wool in "nature's brown". In the book the pictures show the hat to be fairly loose on the baby's head but the hat also fits my 7 year old brothers head, just being a little short.

Sunday, December 21, 2008

knitted bowl


This is a cupcake base from the pattern in the book "One Skein" (Leigh Radford).
I used Patons shetland chunky yarn.

His and hers fingerless gloves


I checked out the book Son of Stitch N' Bitch from the library to see if there was something i could knit for my hubby. I found the pattern "beer gloves" to be fairly easy and fast knit. I started to knit a pair for myself too. For my husbands pair i used needle sizes 6 & 7 and for myself 4 and 5.
The white pair I'm using lion brand yarn, fishermen's wool, color natural.
In response to some questions people had about knitting this pattern i posted the info below in a craftster.org post here.
I wrote out a chart of the pattern to help me remember where I was in the pattern. Just use a stitch counter to keep up where you are. I didn't use circular needles, I don't have any. I used double pointed needles.
Cast on 40 stitches place a marker before the first stitch you cast on, and a different colored marker after the 20th stitch.
[What it says in book]
Whale spine cable stitch:
Rnds 1 & 2: k12
rnds 3: slip first 3 stitches onto extra needle and hold to back, knit next 3 stitches, knit stitches on extra needle, slip next 3 stitches onto extra needle and hold to front, knit next 3 stitches and then knit the 3 stitches on the extra needle
Rnds 4-8: k12
(In book: cuff title):
K2, p2 for 2 1/2" (2 1/2" = 15 rounds)
(In book: Body title):
Chart = whale spine cable stitch (in eights)-row number-palm chart (1-15)
1-16 [needle 1 (palm),*p2, pfb (purl front and back of one stitch), p2; repeat from * to end. needle 2 (back of hand), p2, pfb, p3, *k1, m1 (make 1= pick up bar between stitches and knit through back loop), k1; repeat from * 3 times more, p3, pfb, p2-(50sts:24 on needle 1, 26 on needle 2.]
2-17 [needle 1, purl. needle 2, p7, work row 2 of whale spine cable stitch over next 12 sts, p7.continue in rev st st(purling)and cable stitch as established until glove measures 5"(=30 rows)from beginning]
3-18
4-19
5-20
6-21
7-22
8-23
1-24
2-25
3-26
4-27
5-28
6-29
7-30 (5")
(In book: palm chart title)
(The palm chart is in the book, I didn't know how to write that here and wasn't sure how much of the pattern I was allowed to post, but I left out the palm chart chart, the fingers and how to change it to the right hand)
8-31-1 [needle 1, p4, work row 1 of chart over next 11 sts, p9. needle 2, continue in pattern as established until glove measures 5 1/4"(=32 rows) from beginning]
1-32-2(5 1/4")
(In book: thumb opening)
2-33-3[work to last 7 stitches of needle 1, with an extra piece of yarn p7, slip these 7 stitches back onto the left needle and purl the 7 stitches again but this time with the yarn you are knitting the gloves with; work to end of rnd. continue working in pattern as established until piece measures 7 1/2"(= 45 rows) from beginning. place all stitches on holders]
3-34-4
4-35-5
5-36-6
6-37-7
7-38-8
8-39-9
1-40-10
2-41-11
3-42-12
4-43-13
5-44-14
6-45-15 (7 1/2", place stitches on holders)
Then you just work the fingers as the pattern says in the book.
I believe where it says "Rep rnds 1-12 for patt." is a misprint and is supposed to say repeat rounds 1-8 for pattern.