Showing posts with label how to. Show all posts

Monday, February 2, 2009

How to knit a ruffle

Ruffles are usually something you want to add to something. It tends to look better that way. Rather than just going into a ruffle pattern instead of Binding Off and then picking up the stitches and making the ruffle pattern.

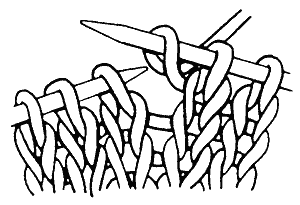
There are some different ways to pick up and knit stitches. One way is to tie the yarn you are going to make the ruffle with to the tail yarn that is the left over from the Casting On at the beginning. And using a crochet hook, I tend to use a size 5/H, pick up the yarn (you are using for the ruffle) with the hook and pull through last loop of every row along that edge. You want to pull the loops through so that they come out on the top. You can then slip the loops off of the crochet hook and onto your knitting needle.

  1. pick up the number of stitches divisible by 4.

  2. Purl

  3. Purl 2, Make 1, Knit 3, [Purl 2, Make 1, Knit 2] 4 times, Purl 2, Make 1, Knit 3

  4. knit the knit stitches, purl the purl stitches and the new stitches (make 1).

  5. Purl 2, Make 1, Knit 4, [Purl 2, Make 1, Knit 3] 4 times, Purl 2, Make 1, Knit 4

  6. repeat row 3

  7. Purl 2, Make 1, Knit 5, [Purl2, Make 1, Knit 4] 4 times, Purl 2, Make 1, Knit 5

  8. repeat row 3

  9. Purl 2, Make 1, Knit 6, [Purl 2, Make 1, Knit 5] 4 times, Purl 2, Make 1, Knit 6 [You can continue to make the ruffle wider just increase one after every purl stitch on the right side and repeat row 3 for every wrong side]

  10. Bind off stitches in the pattern (meaning bind off knit stitches as knit stitches and purl stitches as purl stitches. (ruffle instructions from "boutique knits")
Make 1(M1) can be interchanges with Yarn overs (Yo) instead either way it makes a ruffle.

M1 (Make 1): Lift the yarn lying between the stitch just worked and the next stitch and place it on the left hand needle, then knit (from learn2knit.co.uk )


YO (Yarn Over): When working on the knit side of Stockinette Stitch hold the yarn at the back of the work. Pull the yarn forward between he two needles and over the right needle to the back of the work. Knit the next stitch. (from knit 911. com )
Saturday, January 10, 2009

How to cable knit stitch

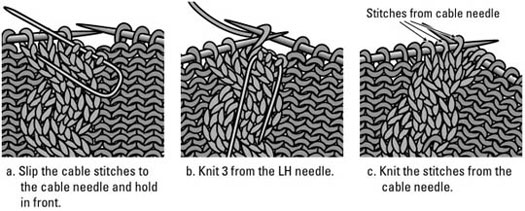
Ok, to make the most basic “simple cable” stitch. You will need an extra knitting needle (what I use is an extra knitting needle in the same size of knitting needles that I’m knitting with (small double pointed needles work well for this) or there are cable stitch holders (that when you slip the stitches you put aside in cable stitching onto these and then put back onto your left hand needle (I believe only when right handed) to stitch).

here are some examples of cable stitch holders:


“simple cable” stitch is worked over 6 stitches (which means wherever you want to place the “simple cable” stitch it is going to takes 6 stitches in a row to make) & explained here knitted flat on straight knitting needles (meaning you knit a row moving stitches from the left hand needle to the right hand needle (where the tip of the right hand needle is pointed to the left) and when you are finished knitting the row and all of your stitches are now on the right hand needle you turn the right hand needle like a weathervane now to point to the right and becomes the needle that is now in your left hand ready to be purled)


Row 1: knit 6 stitches
Row 2: purl 6 stitches
Row 3: knit 6 stitches
Row 4: purl 6 stitches
Row 5: slip first 3 stitches on to an extra needle and pull this needle in front of your work so that the 3 stitches on the extra needle are resting in front of your knitting. Then knit next 3 stitches. Now slip the 3 stitches you slipped off onto the extra needle back onto your left hand needle and knit them.
Row 6: Purl 6 stitches

To continue in cable stitch repeat rows 1-6 over and over.

Here are a couple of links if you still need some help with visualizing this process:


for Mia

Sunday, December 21, 2008

eyelet baby hat


I was surprised by how fast this hat was to knit. I knitted it in one day. It's a variation on the eyelet baby hat in the book "One-Skein Wonders" (edited by judith durant). The edge of the hat is a picot cast-on meathod.

Picot cast-on meathod:

cast on 6 stitches , then bind off 2, leaving 4 stitches. Continue to cast-on 6 stitches and bind off 2 until desired number of stitches are on needle.

I used Lion Brand Yarn wool-ease worsted weight in blush heather.

posted on craftster

Friday, December 19, 2008

shop bag


Here is a bag I made recently based off of a shirt pattern. I took the 2 pattern pieces there were for the front of the shirt. I chose a thick linen looking muslin for the yoke (top piece) and two different (fabric) patterns for the front and back of the bottom (larger part) of the bag. I cut out 2 of the yoke in the linen and 2 out of (reg.) muslin. For the main larger part of the bag I cut out 4, 2 out of muslin and 1 of each the front and back fabric I chose. I took each fabric piece intended for the outside and matched it up with a muslin pattern piece that matched it and surged all the edges. I sewed it together adding some gathering as an accent (between the yoke and bottom). First the yoke pieces to the bottom pieces then the handles, sides and bottom. Then on the inside where the sides meet the bottom to make a 90 degree angle. I folded so the seem down the side would touch and seem across the bottom and measured where it was 2 inches across, sewed and surged for both corners of the bag (this makes it possible to put more stuff in the bag). Then sewed seem binding to the outside of the neck part of the handles and the arm holes of the handles and finished it up by sewing the other side of the seem binding by hand to the inside of the bag.

You can make your own shop bag out of many shirt patterns by just doubling the front of the pattern and not making sleeves. I cut mine out of the largest pattern size (the pattern I used had, 16) and use it to carry around my knitting including the book I’m working from. Can also be used as a library bag or a purse in which you can place your jacket when the temperature fluctuates and it often does here in Texas. Your very own environmentally friendly bag like they have at grocery stores now except more desirable and personal.