Showing posts with label instructions. Show all posts

Monday, February 2, 2009

How to knit a ruffle

Ruffles are usually something you want to add to something. It tends to look better that way. Rather than just going into a ruffle pattern instead of Binding Off and then picking up the stitches and making the ruffle pattern.

There are some different ways to pick up and knit stitches. One way is to tie the yarn you are going to make the ruffle with to the tail yarn that is the left over from the Casting On at the beginning. And using a crochet hook, I tend to use a size 5/H, pick up the yarn (you are using for the ruffle) with the hook and pull through last loop of every row along that edge. You want to pull the loops through so that they come out on the top. You can then slip the loops off of the crochet hook and onto your knitting needle.

  1. pick up the number of stitches divisible by 4.

  2. Purl

  3. Purl 2, Make 1, Knit 3, [Purl 2, Make 1, Knit 2] 4 times, Purl 2, Make 1, Knit 3

  4. knit the knit stitches, purl the purl stitches and the new stitches (make 1).

  5. Purl 2, Make 1, Knit 4, [Purl 2, Make 1, Knit 3] 4 times, Purl 2, Make 1, Knit 4

  6. repeat row 3

  7. Purl 2, Make 1, Knit 5, [Purl2, Make 1, Knit 4] 4 times, Purl 2, Make 1, Knit 5

  8. repeat row 3

  9. Purl 2, Make 1, Knit 6, [Purl 2, Make 1, Knit 5] 4 times, Purl 2, Make 1, Knit 6 [You can continue to make the ruffle wider just increase one after every purl stitch on the right side and repeat row 3 for every wrong side]

  10. Bind off stitches in the pattern (meaning bind off knit stitches as knit stitches and purl stitches as purl stitches. (ruffle instructions from "boutique knits")
Make 1(M1) can be interchanges with Yarn overs (Yo) instead either way it makes a ruffle.

M1 (Make 1): Lift the yarn lying between the stitch just worked and the next stitch and place it on the left hand needle, then knit (from learn2knit.co.uk )


YO (Yarn Over): When working on the knit side of Stockinette Stitch hold the yarn at the back of the work. Pull the yarn forward between he two needles and over the right needle to the back of the work. Knit the next stitch. (from knit 911. com )
Saturday, January 10, 2009

How to cable knit stitch

Ok, to make the most basic “simple cable” stitch. You will need an extra knitting needle (what I use is an extra knitting needle in the same size of knitting needles that I’m knitting with (small double pointed needles work well for this) or there are cable stitch holders (that when you slip the stitches you put aside in cable stitching onto these and then put back onto your left hand needle (I believe only when right handed) to stitch).

here are some examples of cable stitch holders:


“simple cable” stitch is worked over 6 stitches (which means wherever you want to place the “simple cable” stitch it is going to takes 6 stitches in a row to make) & explained here knitted flat on straight knitting needles (meaning you knit a row moving stitches from the left hand needle to the right hand needle (where the tip of the right hand needle is pointed to the left) and when you are finished knitting the row and all of your stitches are now on the right hand needle you turn the right hand needle like a weathervane now to point to the right and becomes the needle that is now in your left hand ready to be purled)


Row 1: knit 6 stitches
Row 2: purl 6 stitches
Row 3: knit 6 stitches
Row 4: purl 6 stitches
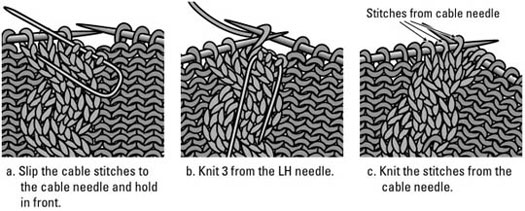
Row 5: slip first 3 stitches on to an extra needle and pull this needle in front of your work so that the 3 stitches on the extra needle are resting in front of your knitting. Then knit next 3 stitches. Now slip the 3 stitches you slipped off onto the extra needle back onto your left hand needle and knit them.
Row 6: Purl 6 stitches

To continue in cable stitch repeat rows 1-6 over and over.

Here are a couple of links if you still need some help with visualizing this process:


for Mia

Sunday, December 14, 2008

screen printing

Being interested in but never having tried it i bought a screen printing kit yesterday. The instructions it came with said there are three different ways to transfer your picture on the screen.

I wanted to make a t-shirt with one of my face drawings on it and my husband wanted to make t-shirts for his band. Since these were both drawings that we wanted to transfer the screens we chose to try out the photographic emulsion method which picks up fine lines.

Ok, so far the screen printing kit by speedball from hobby lobby was $59.99 with a 40% of coupon obtained and printed out from the website came to $38.96. After looking at the instructions a trip to ACE hardware was made where a spotlight(the kind with a clip and long extension cord), 150w flood light bulb, plastic tarp, plastic gloves, masking tape, scotch tape came out to $21.32. Then we went to Kinkos and got transparencies made of the two drawings we wanted to make into our two screens, that cost $1.62

1.First step was to place to masking tape over the frame and the screen fabric evenly on both sides. This helps to keep the screen tight which prevents leaking under screen frame during printing meaning clean printed edges. It said not to choose a design that comes within an inch a the tape and that rubbing the tape with a spoon makes it stick the best.

2. on the back side of the screen (where it lies flat on the ground or the side that will be touching the fabric when you make prints) put four punch pins in the four corners to pick it up from touching the ground.

3. Now to mix the solution. The kit came with a little bottle of diazo sensitizer (yellow black fluid)it said to fill bottle halfway with cold water shake well and then pour into diazo photo emulsion (blue fluid) bottle and shake some more. Make sure the top is on tightly because it leaked some with us. although my husband thought is would shake well by throwing it into the air and it hitting the ceiling(on accident).

4. we laid out the plastic tarp for renters floor protection and plastic gloves prepaired, placed the screen on top of the box the kit came in. Starting with the top of the screen. Pouring a little at a time in a spot or a line of the photo emulsion mixture along the top and sqweeging back and forth on both sides making the entire thing even

5. we placed newspaper at the bottom of the drawer and placed the screen bottom with the thumb tacks on bottom in the drawer and closing it, making it the dark environment it needs to dry in.